 Ship Fairy
Getting Started with Ship Fairy
Ship Fairy helps individuals and businesses compare and purchase discounted USPS, UPS, and FedEx shipping labels all in one place. Whether you are sending a personal package, fulfilling customer orders, or managing regular business shipments, there is no subscription or minimum shipping volume required—you only pay for what you ship.
This guide explains how to set up your Ship Fairy account, prepare and measure a package, compare available shipping services, purchase a label, and give your shipment to the correct carrier.
Before You Begin
To set up your account and create a shipping label, you should have:
- Your email address and account login information
- The complete address from which the package will be shipped
- The recipient's complete delivery address
- The packaged item
- A shipping scale
- A ruler or measuring tape
- A printer or another supported way to access the finished label
- An accepted payment method or sufficient funds in your Ship Fairy wallet
Package the item before weighing or measuring it. Your shipment information should describe the finished package—not the product inside it.
Step 1: Create or Sign In to Your Account
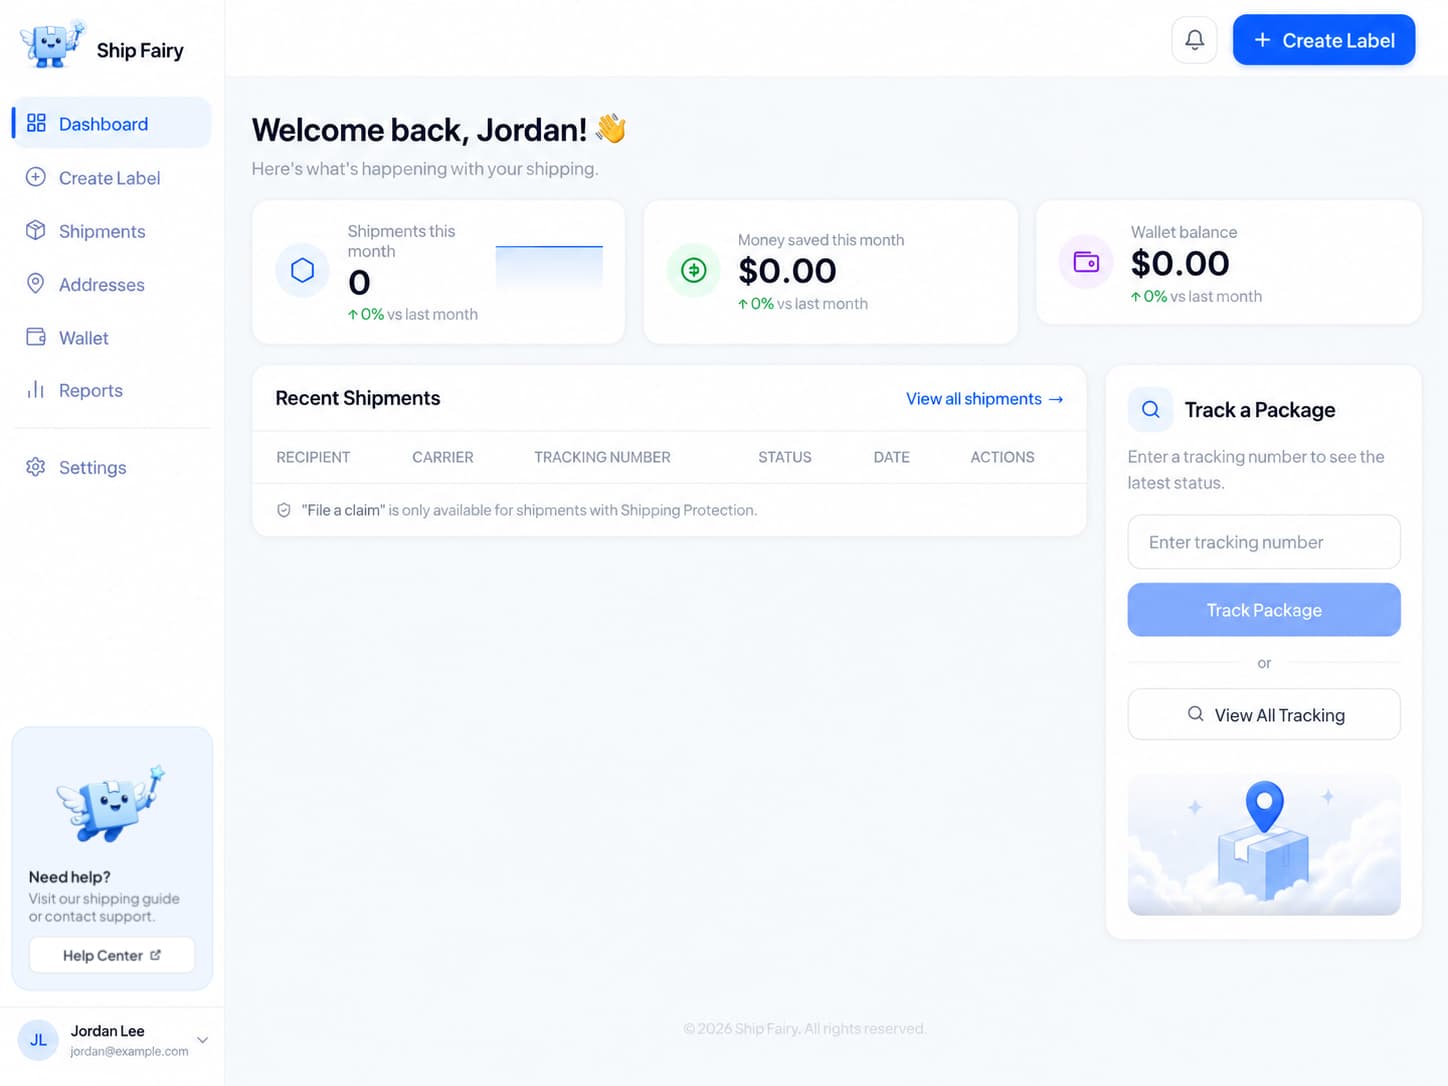
Visit Ship Fairy and select the option to create an account. Follow the prompts to enter the requested information and establish your login credentials. If you already have an account, sign in to access your shipping dashboard.
Your account allows you to manage information associated with your shipments, including:
- Sender addresses
- Shipment preferences
- Purchased shipping labels
- Tracking information
- Billing activity
- Refund updates
- Insurance claims, when applicable
- Account settings
Use a secure password and do not share your account credentials with anyone.
Step 2: Add Your Sender Address
When you sign up for Ship Fairy, you provide a sender address during the onboarding process. Ship Fairy saves that information and automatically displays it in the Shipping from section whenever you create a label.
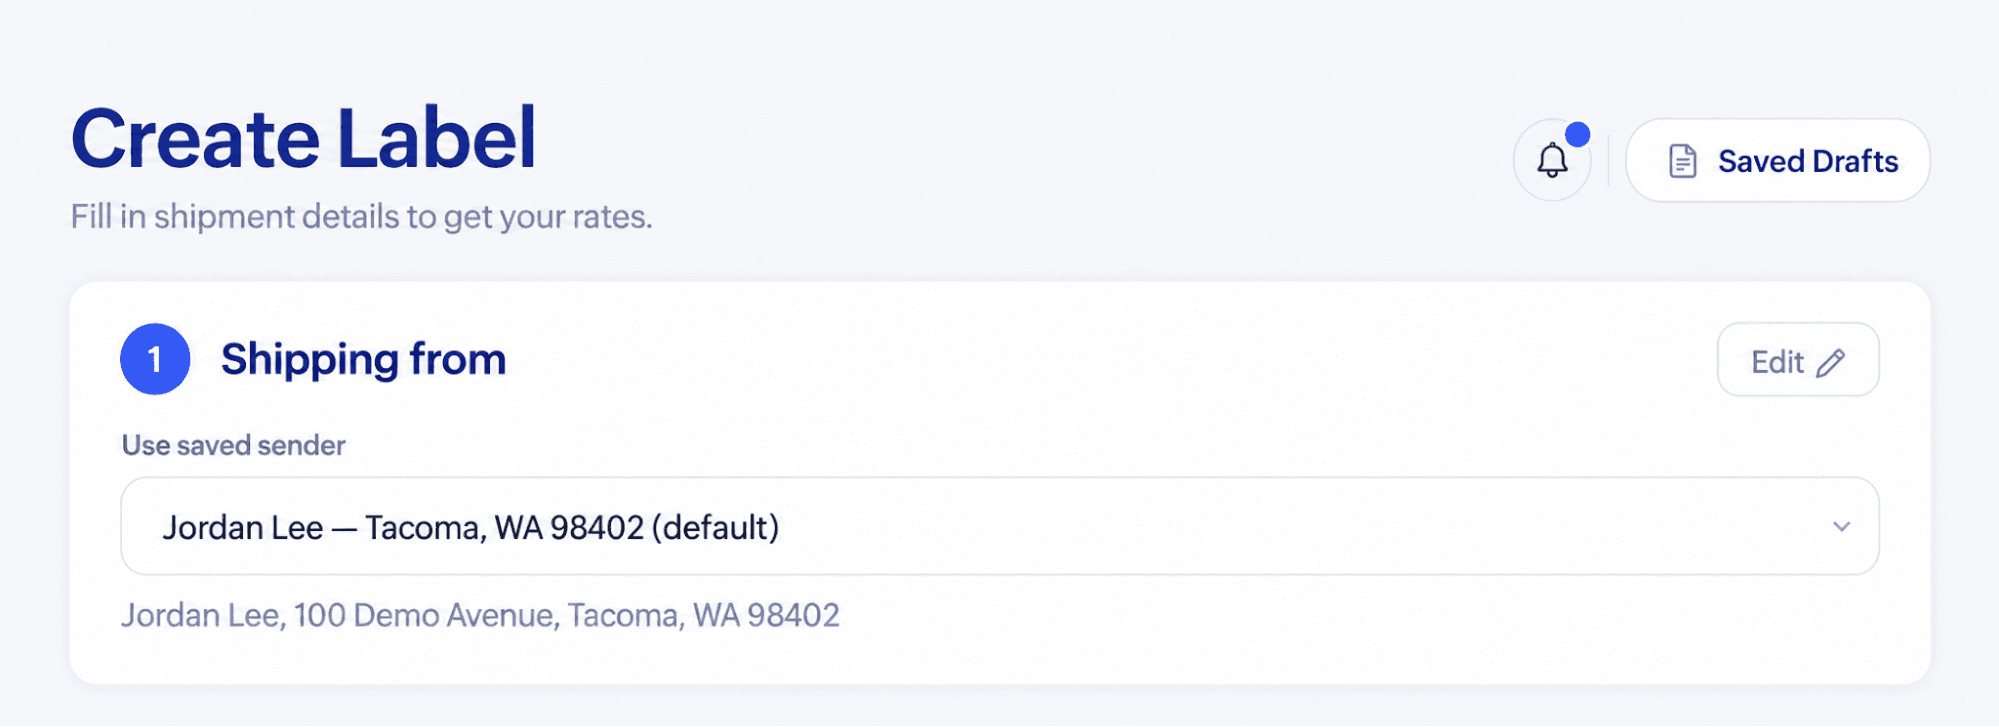
You do not need to reenter the same address for every shipment. Before continuing, review the displayed information to confirm that the sender's name, street address, city, state, and ZIP Code are correct.
If you are shipping from a different location or need to correct the information, select Edit and update the sender address before purchasing the label.
The sender address identifies where the package is being shipped from, helps determine which shipping services and rates are available, and provides a return location if the package cannot be delivered.
Step 3: Enter the Recipient's Address
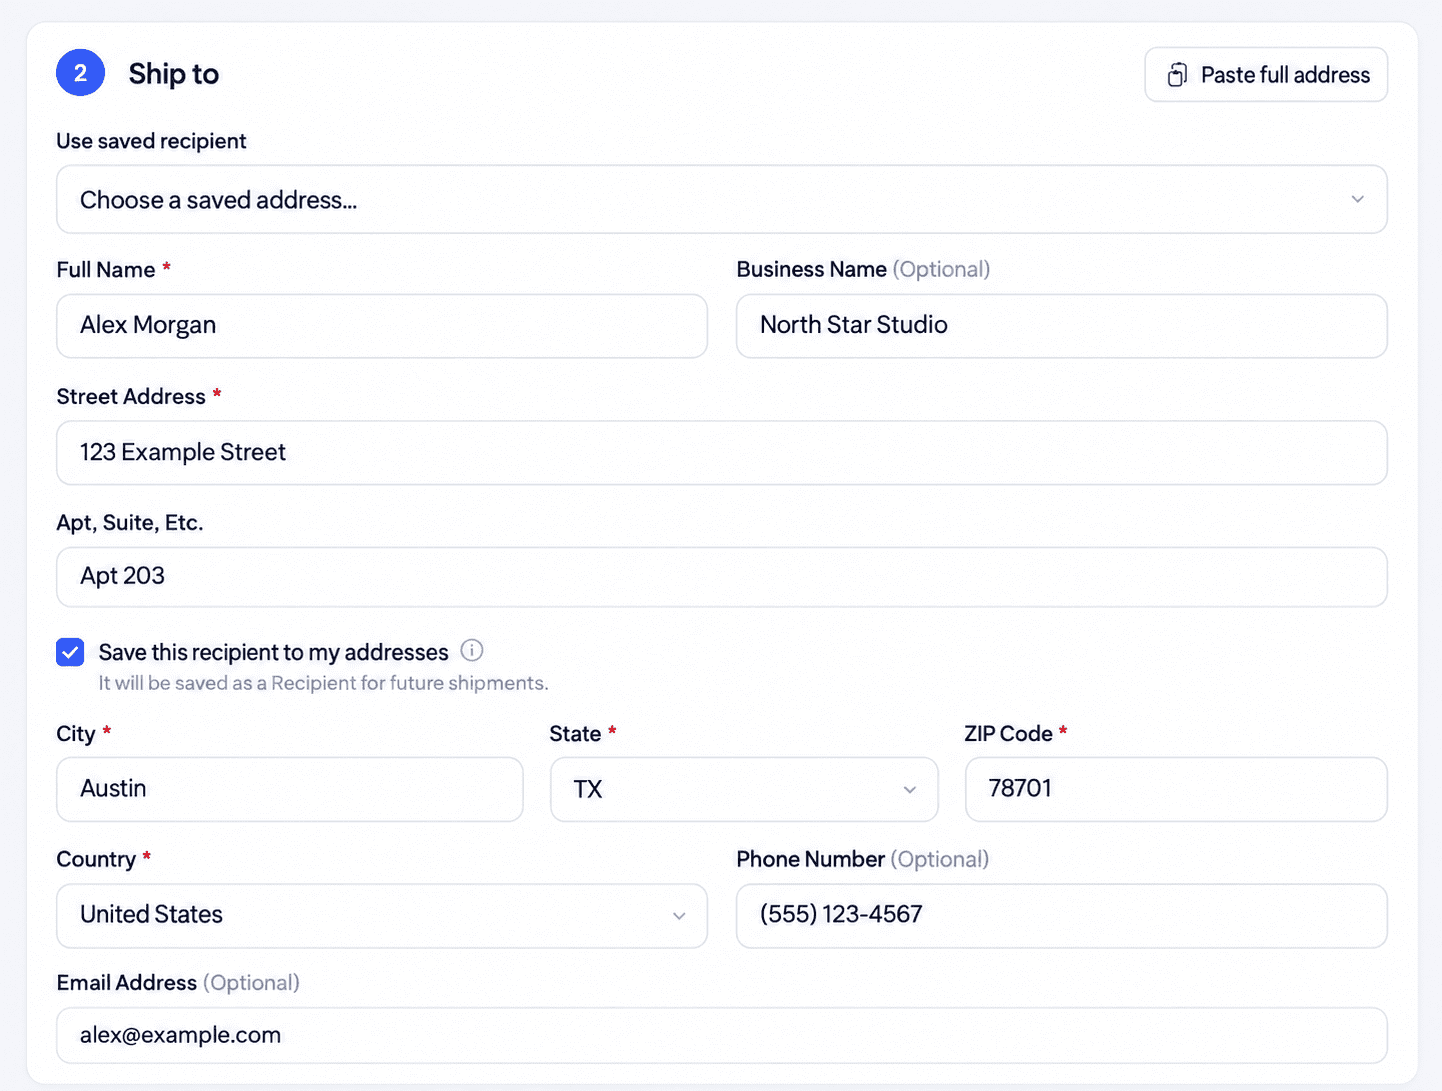
In the Ship to section, enter the complete address of the person or business receiving the package.
Ship Fairy will ask for:
- Recipient's full name
- Business name, if applicable
- Street address
- Apartment, suite, or unit number
- City
- State
- ZIP Code
- Country
- Phone number, when applicable
- Email address, when applicable
Review the address carefully before proceeding. Confirm the street number, spelling, apartment or suite number, city, state, ZIP Code, and country.
If Ship Fairy verifies the address, make sure the verified information still matches the intended destination. Address verification can help identify formatting or delivery issues, but you are responsible for confirming that the recipient information is correct.
You will also have the option to save the recipient to your addresses for future shipments.
An incomplete or incorrect delivery address can result in delays, returns, additional charges, or delivery to the wrong location. Contact the recipient before purchasing the label if any part of the address is unclear.
Step 4: Prepare, Weigh, and Measure Your Package
Place the item in the box, envelope, or other packaging you intend to ship. Include the packing materials, inserts, protective padding, and any other contents before measuring or weighing it.
Choose packaging that:
- Fits the item appropriately
- Protects the contents during transit
- Closes securely
- Has enough flat space for the shipping label
- Does not display old shipping labels or barcodes
Remove or completely cover any previous labels and tracking barcodes if you are reusing packaging. An old barcode could interfere with carrier scanning. Additionally, carrier-provided packaging is restricted to specific services. Make sure the package type selected in Ship Fairy matches the packaging you are actually using.
Place the finished package on a shipping scale and record its total weight. Then measure the exterior of the package at its widest points:
- Length: The longest side
- Width: The next-longest side
- Height: The remaining side
Do not rely on dimensions printed on a box unless they accurately represent the exterior measurements of the finished package.
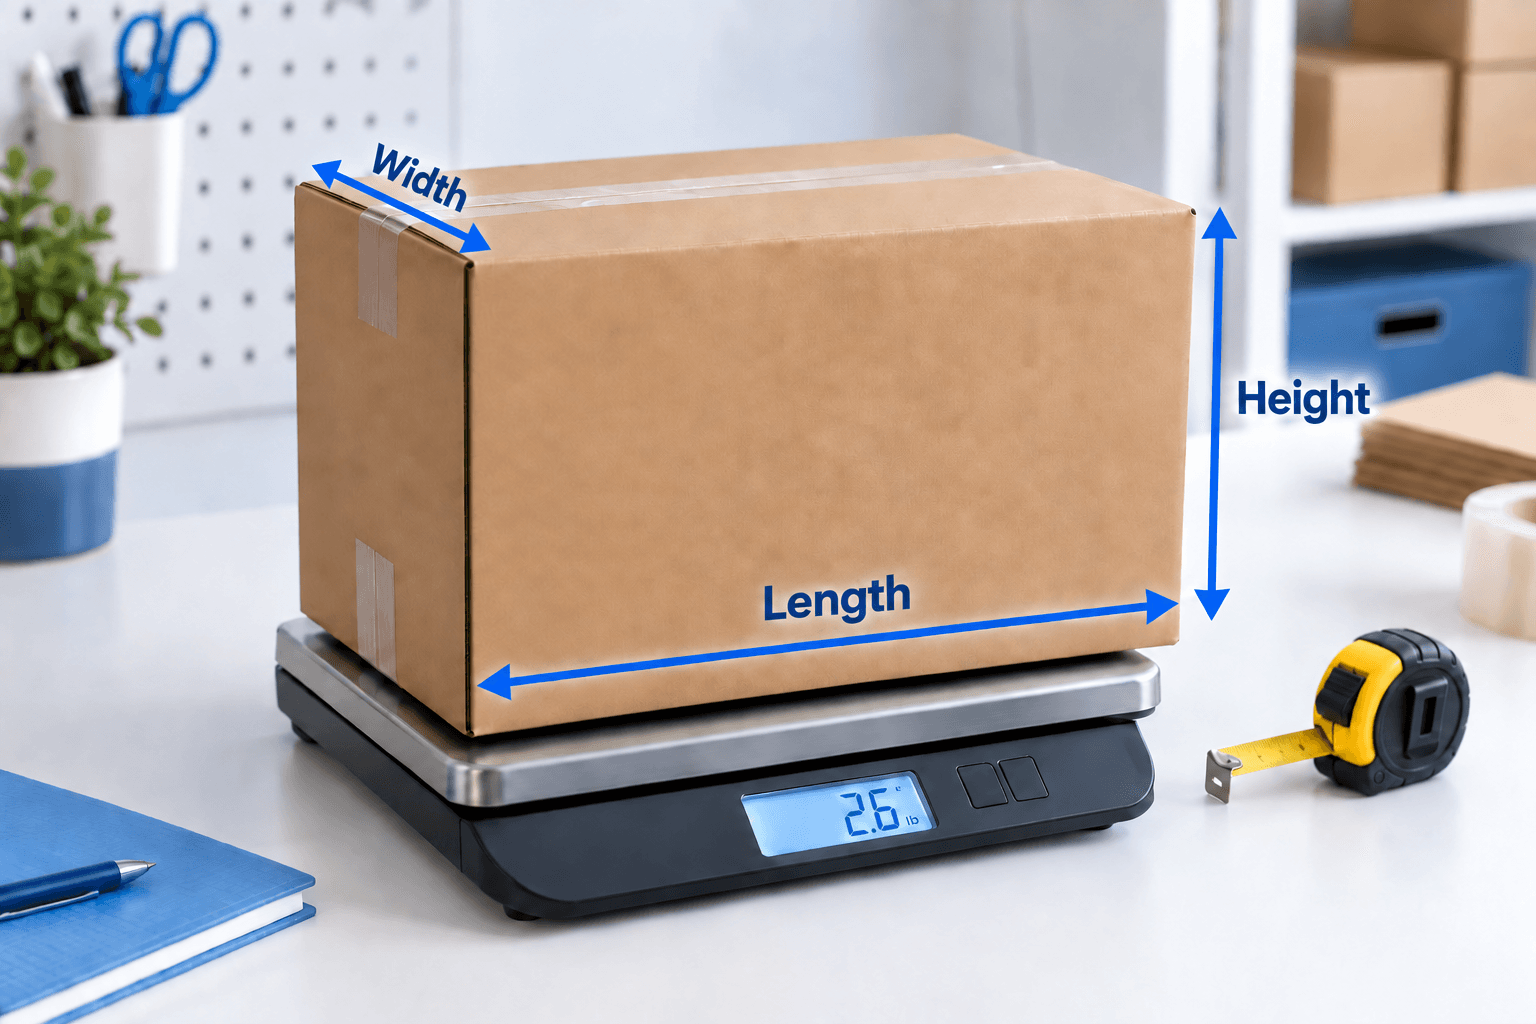
In the Packagesection of Ship Fairy, enter the shipment's total weight, select the correct package type, and provide its length, width, and height.
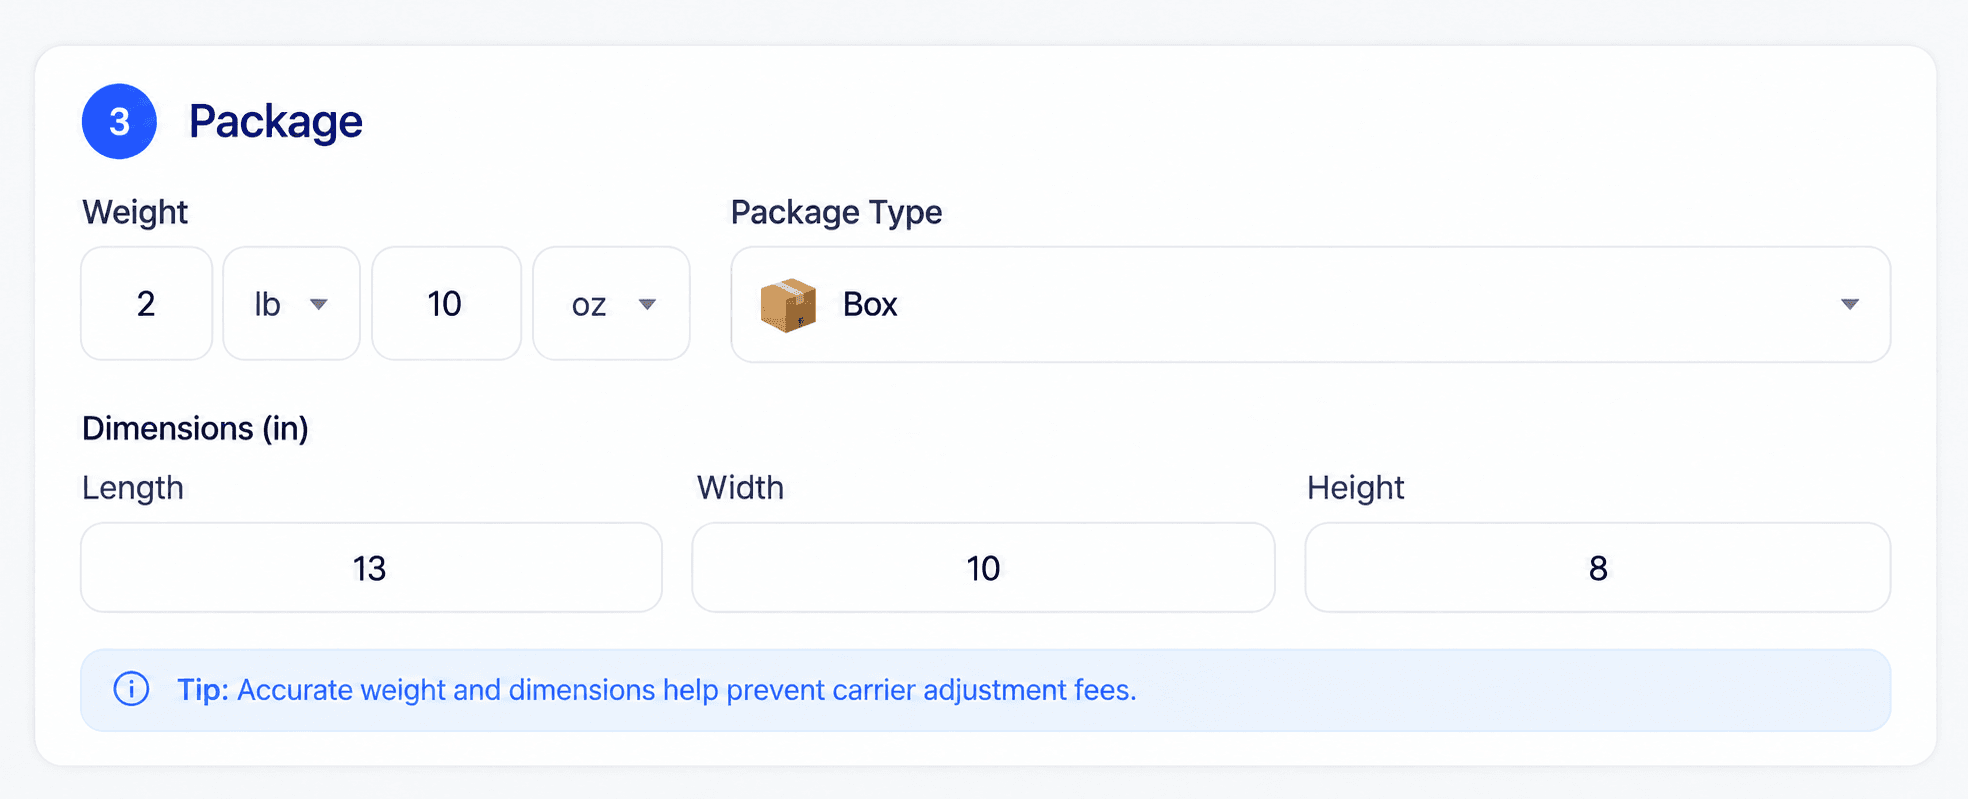
Accurate package information is important because carriers may inspect shipments after acceptance. If the package's actual weight, dimensions, packaging, or service does not match the information submitted, the carrier may issue a price adjustment.
Step 5: Compare Available Shipping Services
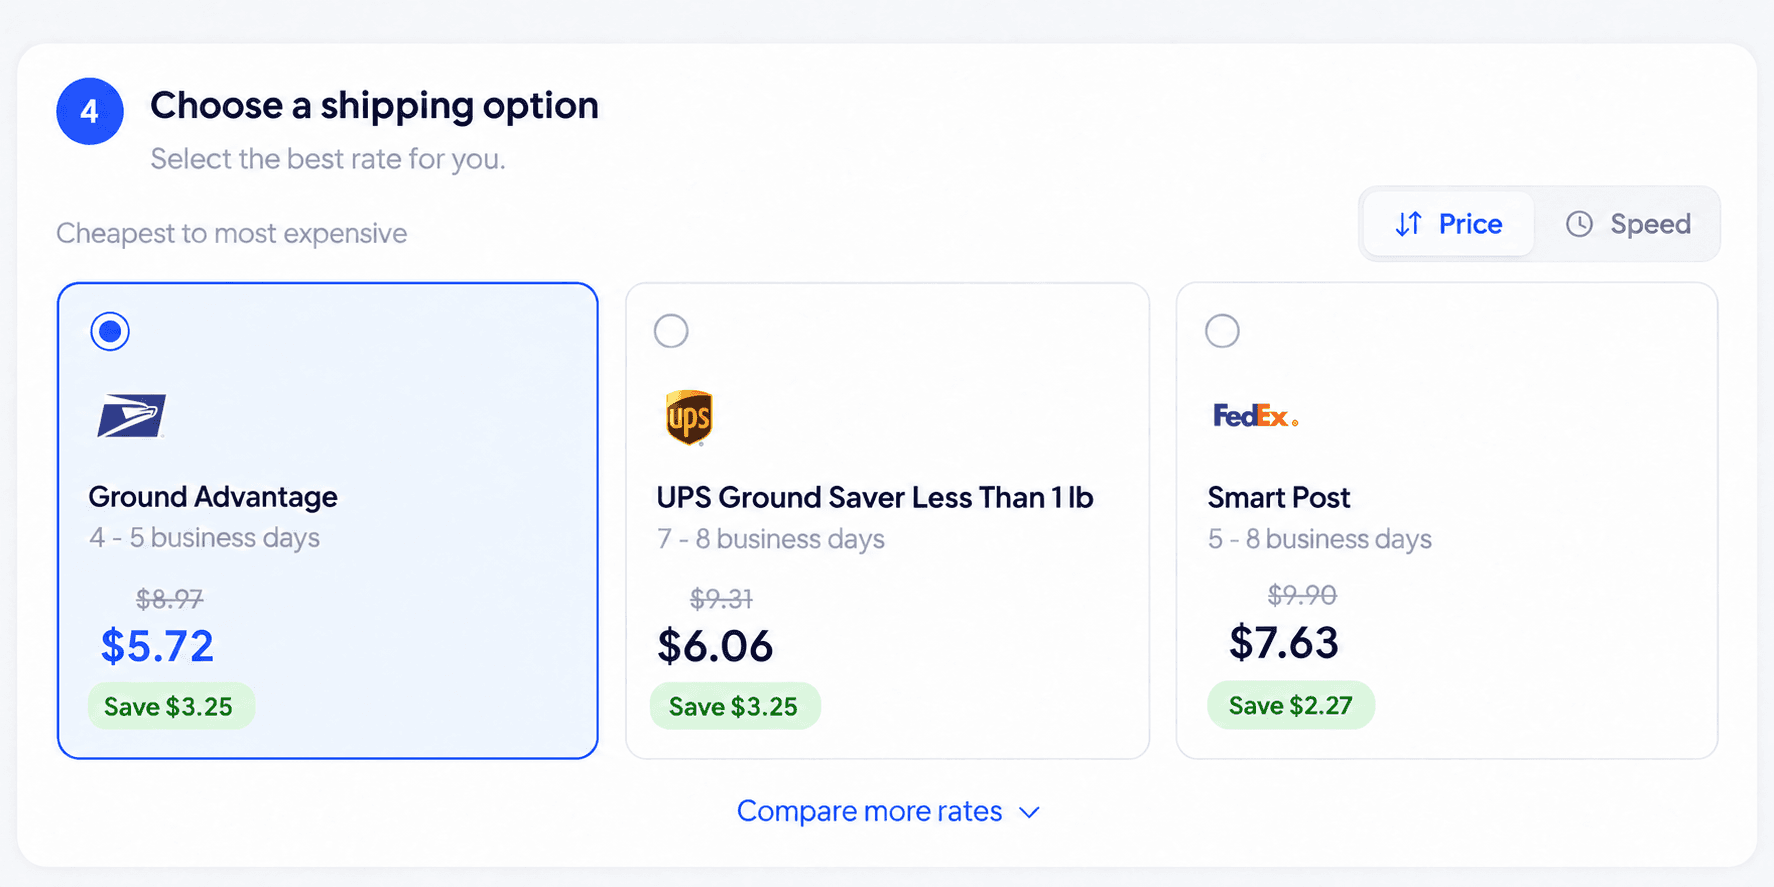
After you enter the sender address, recipient address, and package details, Ship Fairy displays the shipping services and rates available for your shipment.
Depending on the shipment, you may see options from:
- USPS
- UPS
- FedEx
The available services and prices are based on information such as the origin, destination, package type, weight, dimensions, and special shipment requirements.
Compare more than the price when choosing a service. Consider:
- The carrier
- The service name
- The estimated transit time
- The cost
- Tracking availability
- Package eligibility
- Any additional services you may need
You can use the Price and Speed options to organize the displayed services. Select Compare more rates if you want to review additional available options.
The least expensive service is not necessarily the best choice for every shipment. Consider when the package needs to arrive and whether the selected service is appropriate for its contents and packaging.
Displayed transit times and delivery dates are estimates unless the selected carrier service expressly includes a delivery guarantee.
Step 6: Select Additional Services
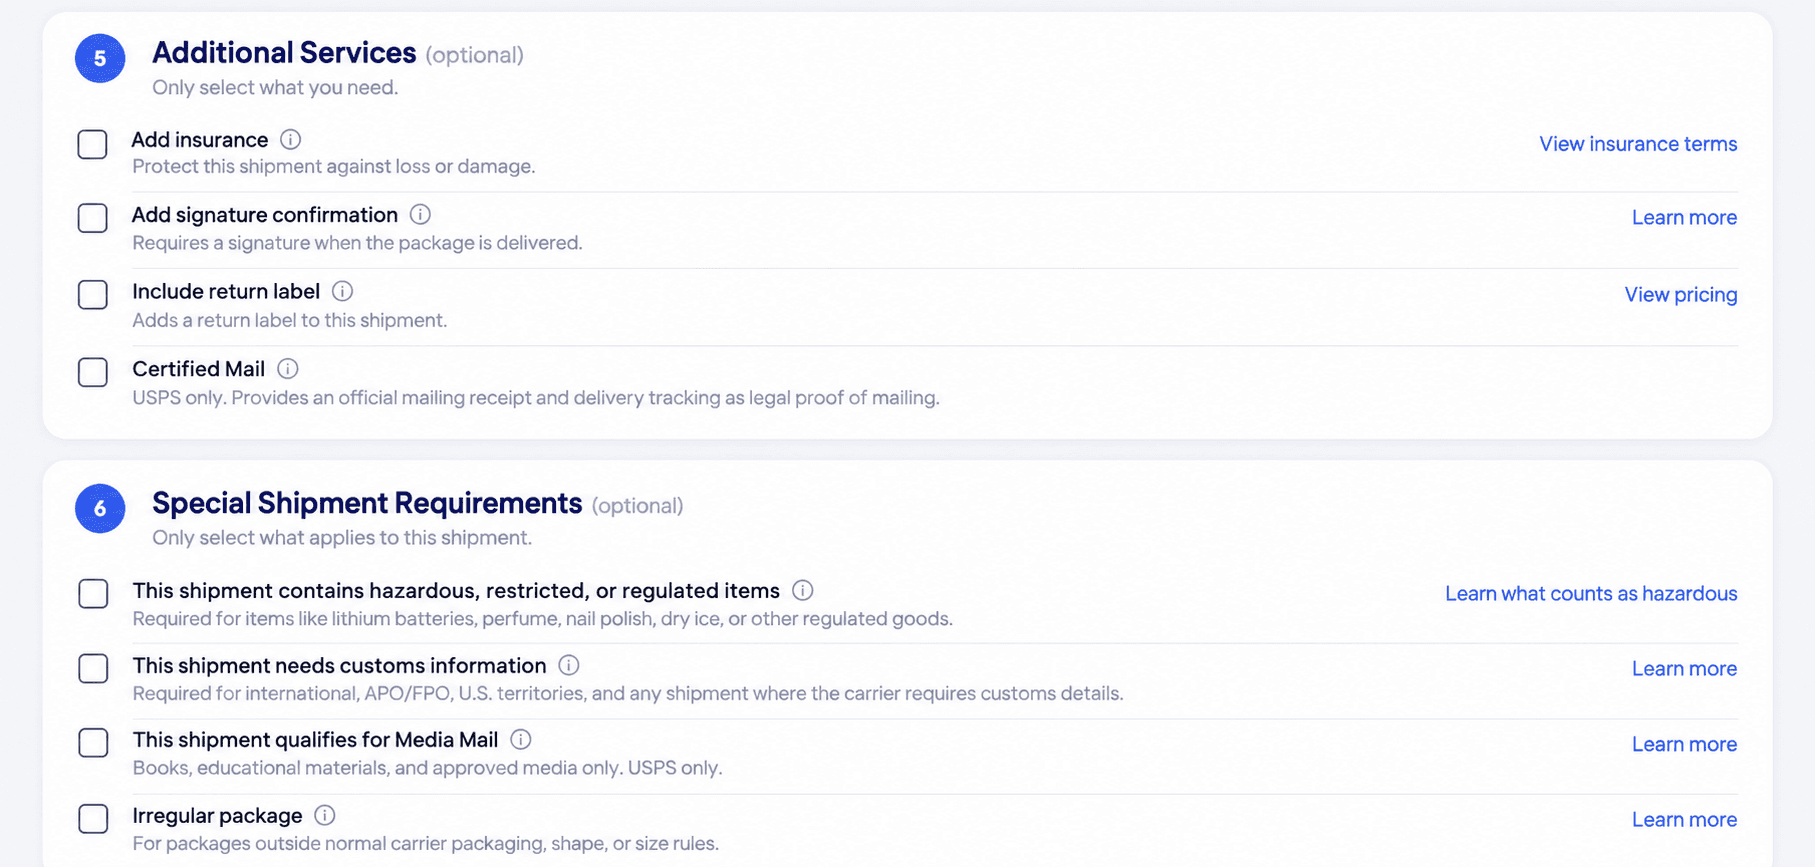
Depending on the carrier and shipping service selected, Ship Fairy may offer additional services for your shipment.
Available options may include:
- Shipping insurance — additional protection against eligible loss or damage.
- Signature confirmation — requires the carrier to obtain a signature when the package is delivered.
- A return label — can be included when the recipient may need to send an item back.
- Certified Mail — available only for eligible USPS shipments.
Only select the services that apply to your shipment. Review the displayed description, eligibility information, terms, and pricing before continuing. The availability and price of each service may depend on the selected carrier, shipping service, destination, and package.
Step 7: Identify Special Shipment Requirements
Ship Fairy also asks whether the package has any special shipment requirements. Select every option that accurately applies to the shipment.
Special requirements may include:
- Hazardous, restricted, or regulated contents
- Customs information for an international shipment
- Items that qualify for Media Mail
- Irregular packaging
Hazardous or regulated items may include materials such as lithium batteries, perfume, nail polish, aerosols, or other restricted goods. These items may require special packaging, labeling, documentation, or an eligible carrier service.
International shipments generally require customs information describing the contents, quantity, value, country of origin, and other requested details.
Select Media Mail only when the contents meet USPS eligibility requirements. Do not select it simply because it displays a lower price.
Select Irregular package when the shipment falls outside ordinary packaging, shape, or size requirements. Irregular packages may be handled or priced differently by the carrier.
Answer these questions accurately. A package containing restricted materials or requiring customs information should not be submitted as an ordinary shipment.
Step 8: Review the Estimated Total and Create Your Order
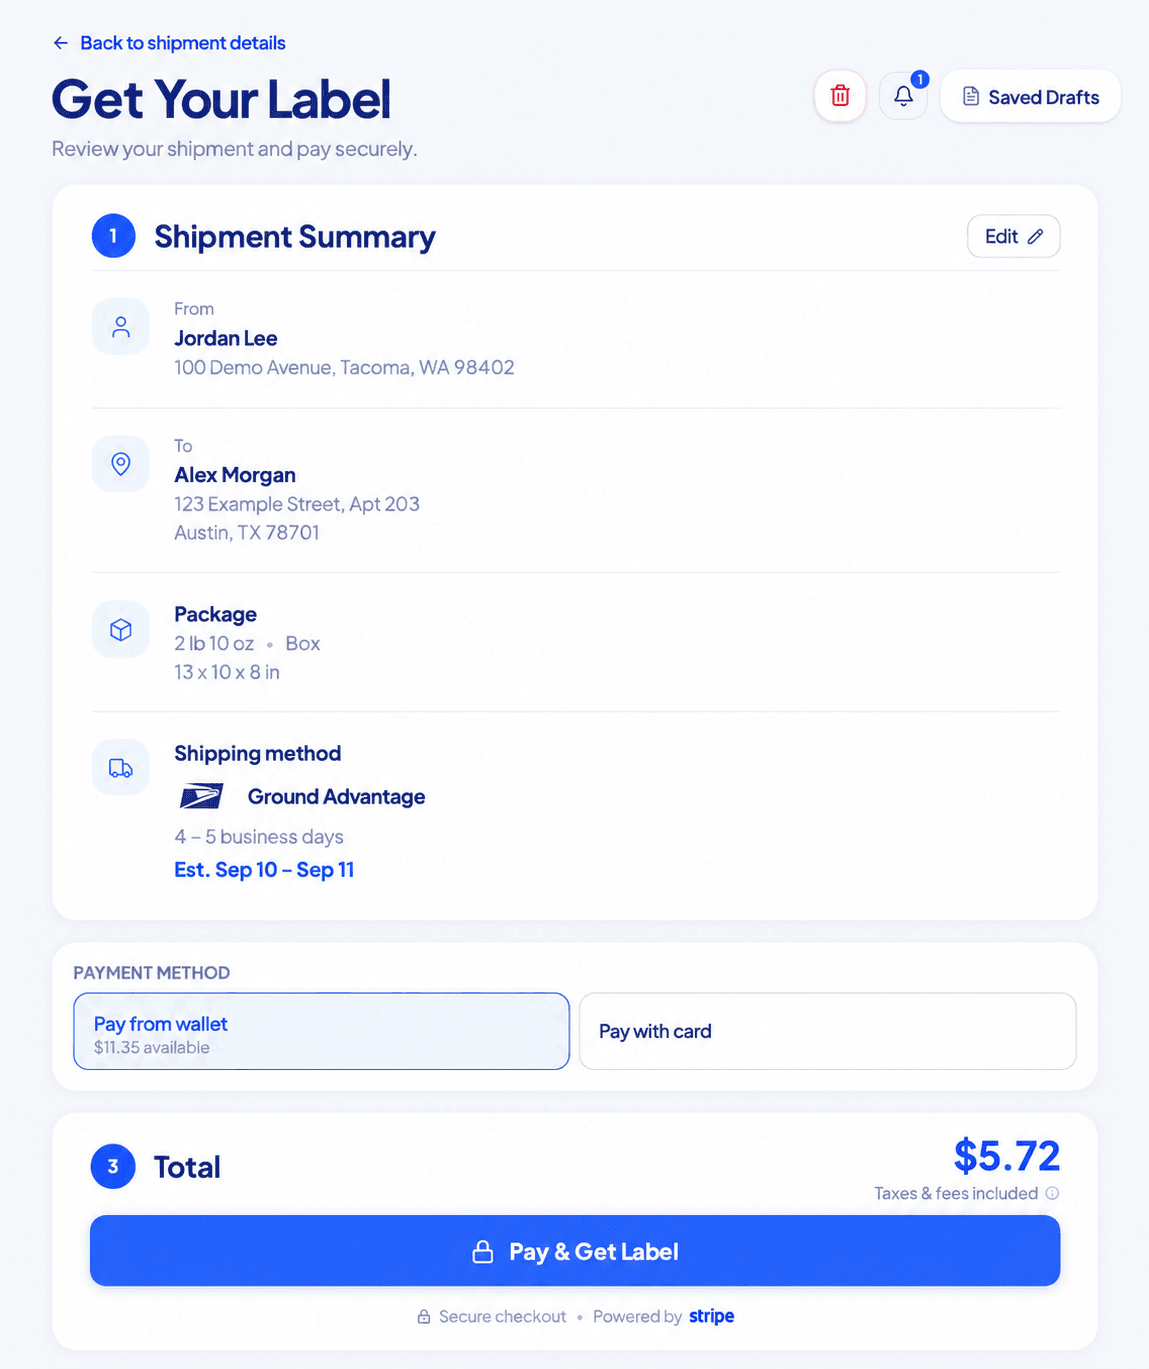
Before purchasing the label, review the complete shipment one final time.
Confirm that:
- The sender address is correct
- The recipient address is complete
- The package type matches the packaging
- The entered weight includes the item and all packing materials
- The length, width, and height are accurate
- The selected carrier and service meet your needs
- Any necessary additional services are selected
- All special shipment requirements are identified
- The estimated order total is understood
If you are not ready to complete the shipment, select Save draft when that option is available. This allows you to return to the shipment later.
When all information is correct, select Create Order and follow the payment instructions. After the order is completed successfully, you can access the purchased shipping label through your Ship Fairy account.
Do not manually change the address, service information, or barcode on a completed label. If you discover an error after purchasing it, review Ship Fairy's cancellation and refund instructions before creating a replacement.
Step 9: Print and Attach the Label
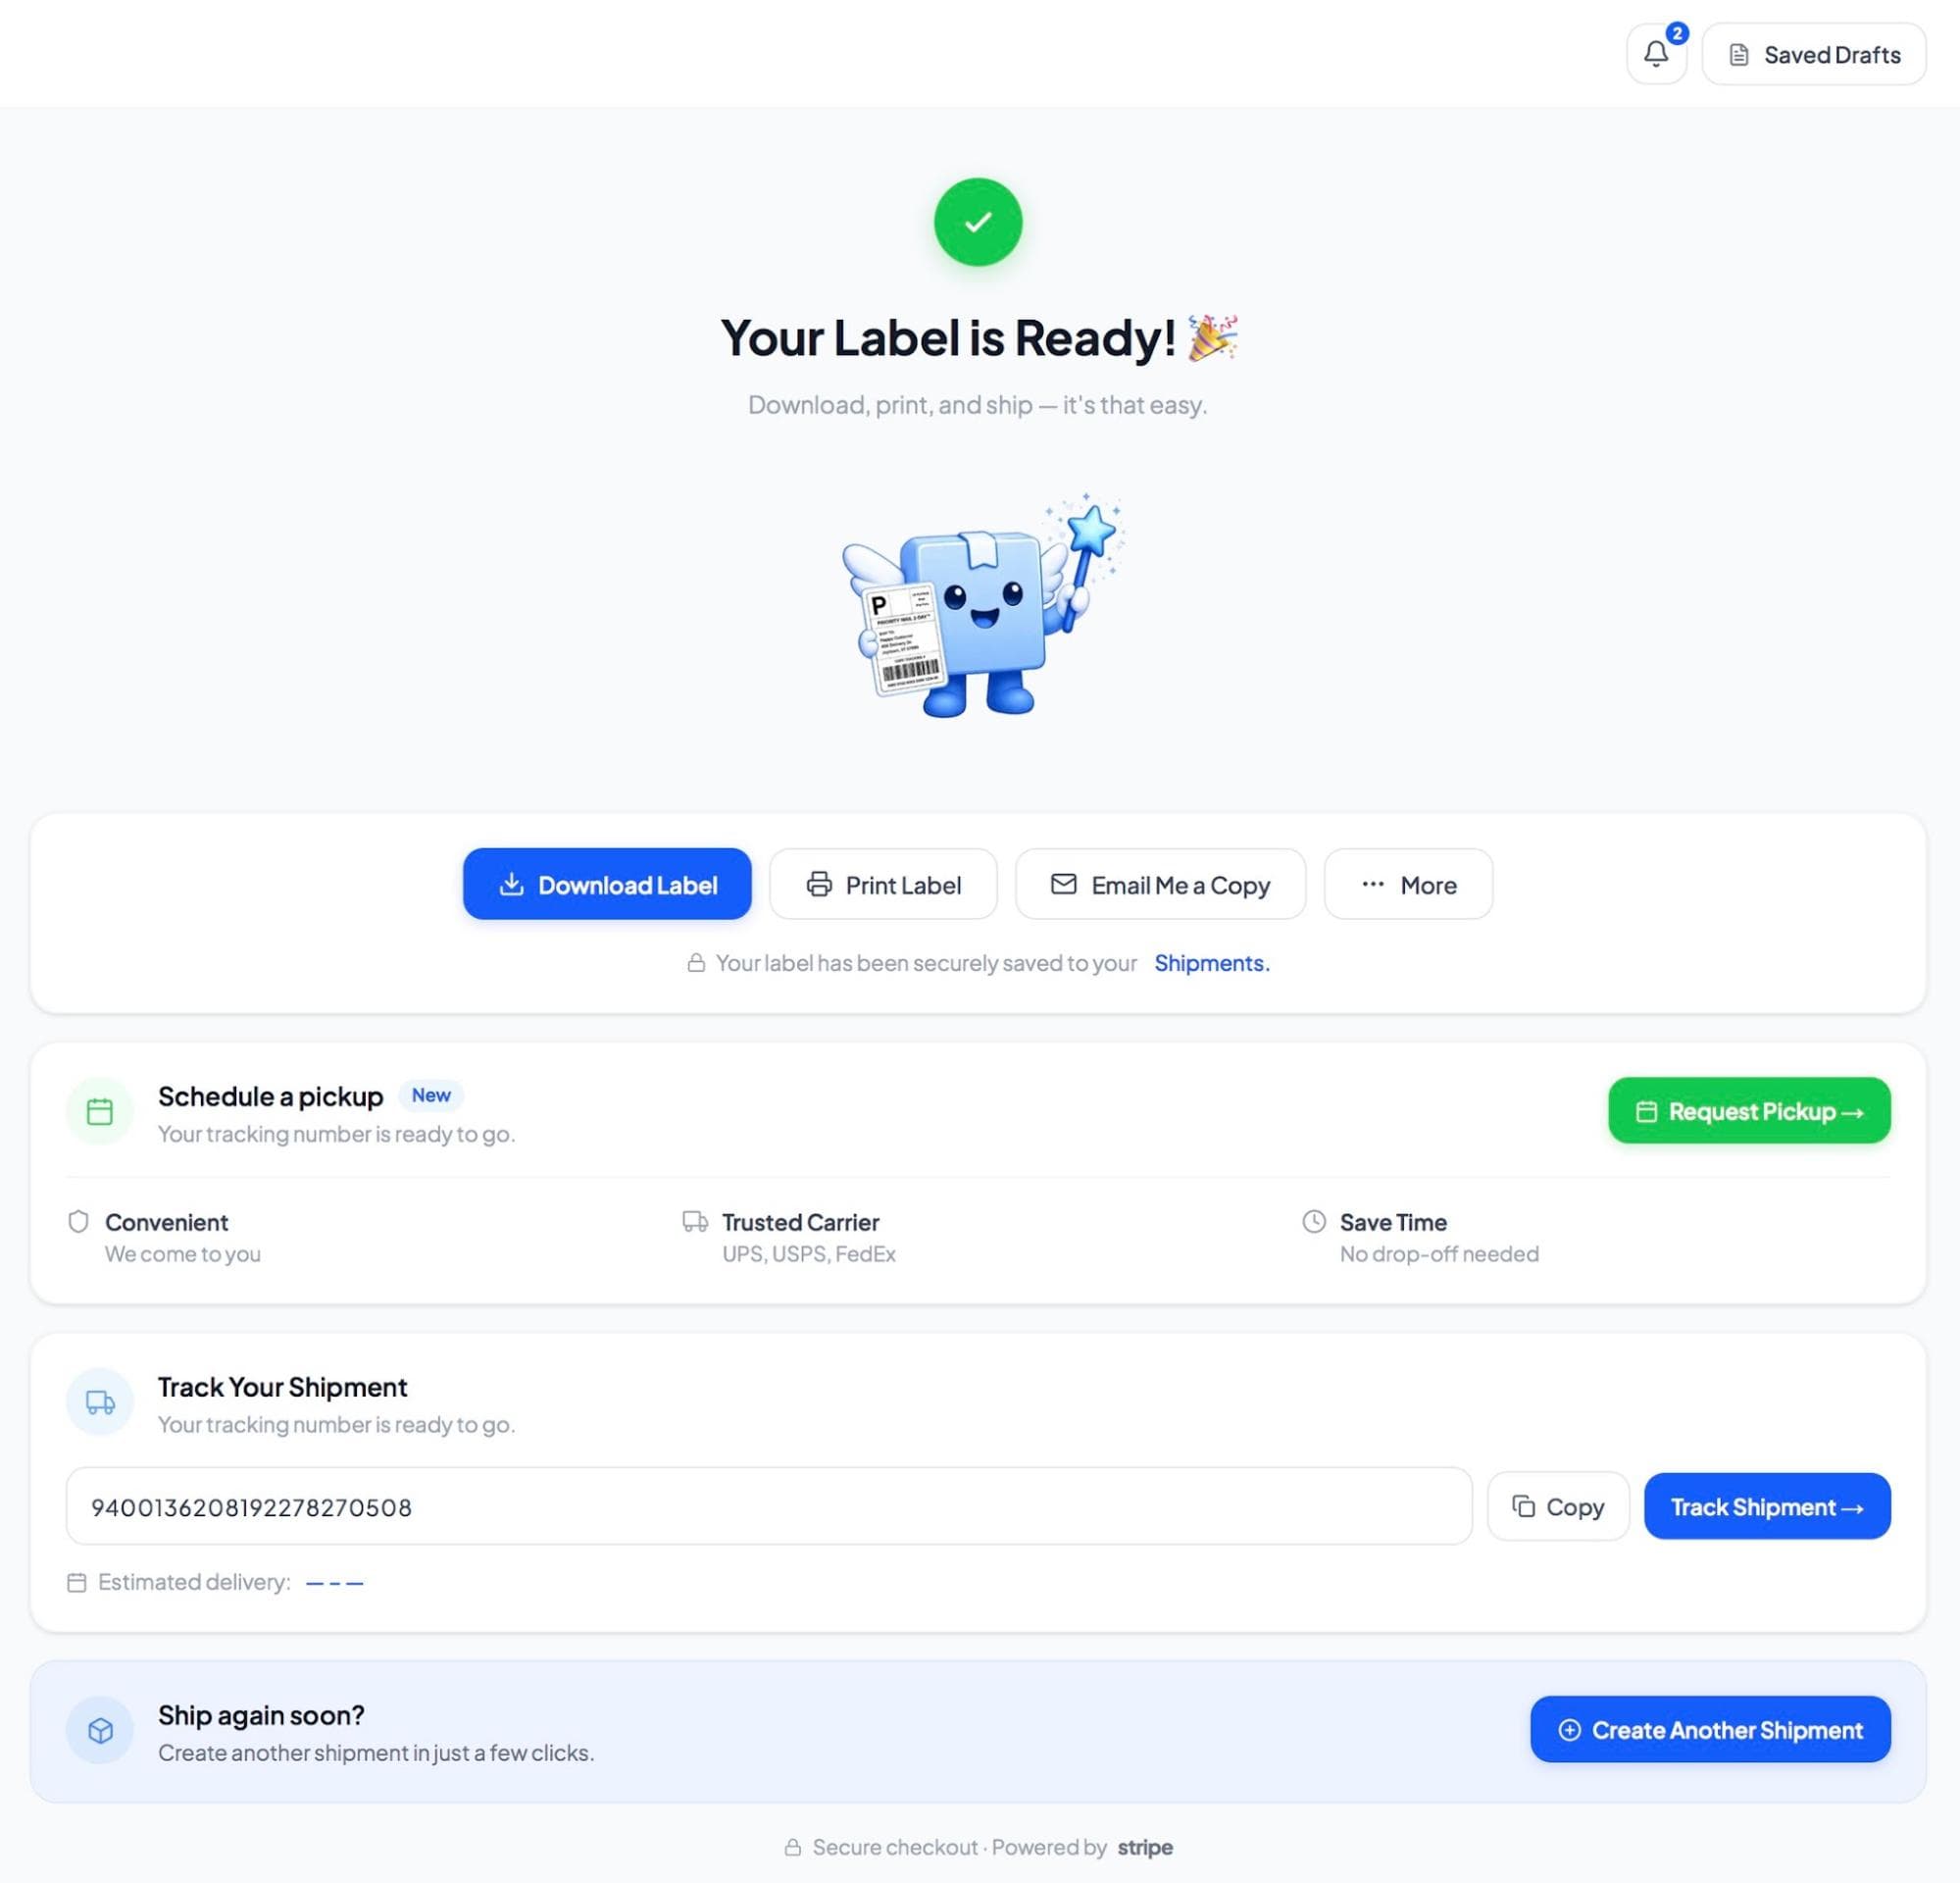
After your payment is completed, Ship Fairy displays the Your Label is Ready page. From this page, you can choose how you want to access the label:
- Download Label: Save a copy of the label to your device then print.
- Print Label: Send the label directly to your connected printer.
- Email Me a Copy: Send a copy of the label to your email so you can access it from another device to print.
Ship Fairy also saves the label under Shipments, allowing you to return to it later if needed. If the label does not print clearly, print a fresh copy rather than attempting to trace, rewrite, or repair the barcode.
Schedule a Carrier Pickup (Optional)
Some eligible shipments may include the option to request a carrier pickup. If pickup service is available for the carrier and shipping service you selected, a Request Pickup button will appear on the confirmation page.
Select Request Pickup and follow the prompts to review the available pickup details. This optional service may allow you to have the package collected from your location instead of taking it to a carrier drop-off location.
Pickup availability depends on factors such as the carrier, selected service, pickup address, package eligibility, and requested date. Not every carrier or shipment supports pickup through Ship Fairy. If the option does not appear, give the package to the carrier identified on the label using an approved drop-off or acceptance method.
Copy or View the Tracking Number (Optional)
The shipment's tracking number appears in the Track Your Shipment section.
Select Copy if you want to copy the tracking number to your device. You can then paste it into an email, text message, order update, or another communication with the recipient.
Select Track Shipmentif you want to view available tracking information. Using these tools is optional, and you may also track the package through the carrier's official tracking service.
Tracking activity may not appear immediately after the label is created. Updates generally begin after the carrier receives and scans the package.
Step 10: Attach the Label and Give the Package to the Correct Carrier
Print the shipping label and attach it securely to the largest flat surface of the package.
Before handing over the shipment, make sure:
- The entire label is visible and lies flat.
- The delivery address can be read.
- The barcode is unobstructed.
- No tape, wrinkles, seams, or package edges interfere with the barcode.
- Any previous shipping labels and barcodes have been removed or completely covered.
Do not resize the label in a way that distorts its contents, and do not write over or manually alter the barcode. If the label is damaged or does not print properly, print another copy from the Shipments section of your Ship Fairy account.
Give the Package to the Correct Carrier
The package must be given to the carrier shown on the purchased label:
- Give a USPS-labeled package to USPS.
- Give a UPS-labeled package to UPS.
- Give a FedEx-labeled package to FedEx.
Use an appropriate carrier location, an authorized acceptance location, or a scheduled pickup when that option is available for your shipment. Do not leave the package with a different carrier.
When to Request a Receipt
Ship Fairy allows you to manage your purchased labels, tracking numbers, and shipment activity from your account, so you do not need a carrier receipt to locate or manage the shipment in Ship Fairy.
However, if you take the package to a carrier or authorized drop-off location, request an acceptance receipt before leaving. The receipt provides proof that the package was handed to the carrier and may be useful if the first tracking scan is delayed or a shipping issue occurs.
Keep the drop-off receipt until the carrier records the package in its tracking system. For valuable or time-sensitive shipments, consider keeping it until delivery is confirmed.
If the package is collected through a scheduled pickup, monitor its status in Ship Fairy and confirm that the carrier records an acceptance scan.
Tracking may not update immediately after a package is dropped off or collected. The first update generally appears after the carrier receives and scans the shipment into its network.
Important Reminders
For a smoother shipping experience:
- Verify every address before purchasing a label.
- Weigh and measure the completed package.
- Select the packaging type actually being used.
- Read the details of the carrier service you select.
- Attach the label flat and keep its barcode unobstructed.
- Give the package to the carrier printed on the label.
- Keep your carrier acceptance receipt.
- Monitor tracking until delivery.
- Review any notifications from Ship Fairy regarding the shipment.
Continue Learning
Use these Ship Fairy guides as you prepare your first shipment:
- How to Create and Set Up Your Ship Fairy Account
- How to Create Your First Shipping Label
- How to Measure and Weigh a Package Correctly
- How to Compare Shipping Rates on Ship Fairy
- How Ship Fairy Billing Works
- How to Track a Package With Ship Fairy
Start Shipping With Ship Fairy
Ship Fairy brings available USPS, UPS, and FedEx shipping services together so you can compare options and purchase the label that fits your shipment.
Sign in or create a Ship Fairy account when you are ready to start saving on every shipment!
Last updated: September 2026
Reviewed by: Ship Fairy Support
Contact Information:
Email: support@shipfairyexpress.com